
User management overview
Accessing the User management page
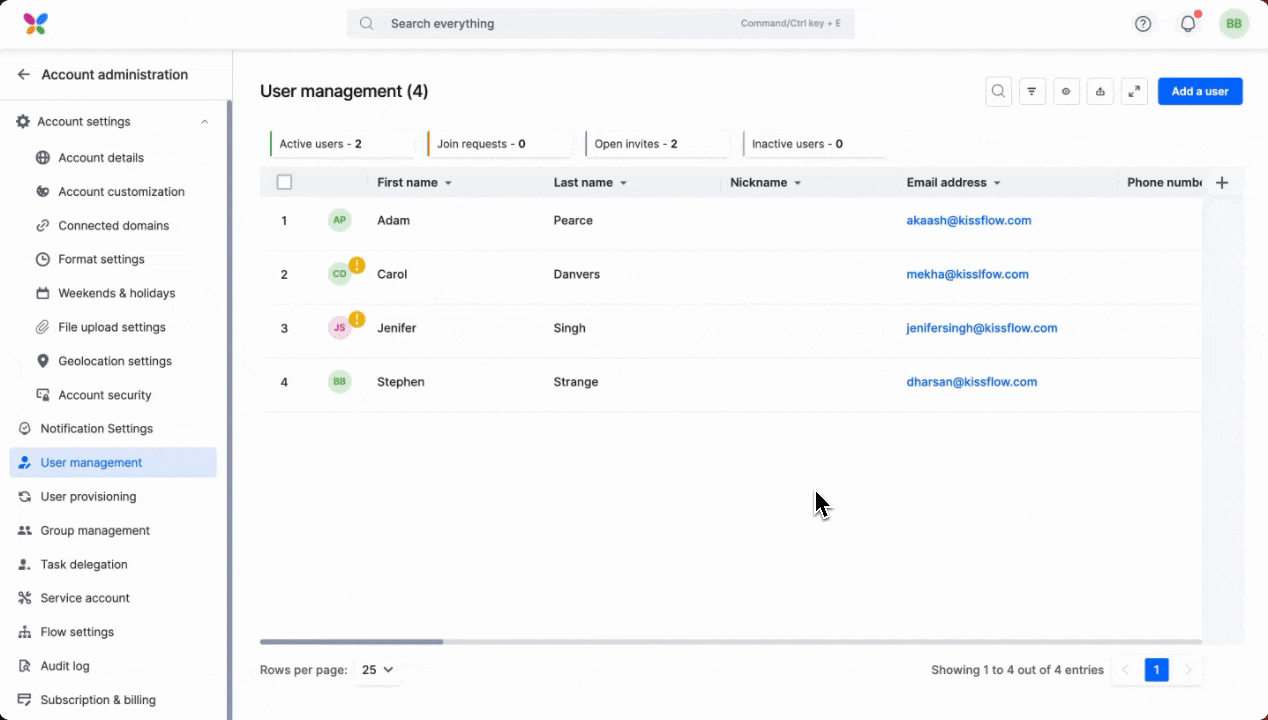
Super Admins, IAM Admins, and User Admins have access to the User Management tab in the Account Administration section, which gives an overview of all the users in the organization.

The following tiles on top act as a quick filter and help you get an overview of:
- Active users: Verified users who are actively using a license.
- Join requests: Users who have requested to join the account via the shared sign-up URL.
- Open invites: Invited users who have not verified their accounts.
- Inactive users: Users who do not have an active license but whose data is still in the account.
You can also perform actions like adding, deleting, and configuring SCIM-based user provisioning from the User management section.
Using search and filters
You can also find desired values within the User Management table using the search and filter features. These are particularly useful when you have many users or when finding specific values from the table becomes harder.
Search. You can enter any keyword in the search box to find relevant results from the table.
Filters. You can get desired values from the table by setting up filters. To enable a filter, click the Filter button (![]() ) and choose the preferred criteria based on which you want to see the results.
) and choose the preferred criteria based on which you want to see the results.
Under the Advanced filter, you can choose a Field, Operator, or Type and map a value or a field based on the type. You can add an AND or OR condition and define more criteria to limit the values shown. Click the Add new filter button to set up additional filter blocks. Once you’ve defined the filters, click the Apply button. You can click the Clear All button to remove all the set filters.
Showing and hiding fields
You can decide which fields to show and hide in the User Management table. Click the Show or hide fields button ( ). Then, select which fields you want to see in the table and deselect the ones you want to hide. You can also hide a field by clicking the Expand button (▼) next to the field name header and clicking Hide Column. There are 15 fields that you can choose to show or hide.

Some fields like First name, Last name, and Nickname are collected while signing up for your Kissflow account. Fields like Added on, Last signed in are automatically generated based on when you first signed up and last used your Kissflow account. Last access and Programmatic access show when you accessed your Kissflow account and whether you used any Access keys you created.
Custom columns
The user management table offers a variety of default columns of different field types. You can create a custom column in the production environment if you need a specific type of column beyond the default options.
Custom columns can be of a number of simple and complex field types, such as Text, Text area, Number, Attachment, Signature.
Creating a custom column
- Click the + icon to open Settings. Enter the column and field type.
- When you create a custom column, the field ID is automatically created based on the field name. However, this is editable.
- Mark the custom column as required if needed, but it is not a mandatory setting.

- You can set up validation rules for the custom column in the Validation tab. You can choose from a number of operators and set up one or more conditions for a column.

- The custom column can be sorted or hidden. You can also control the visibility and determine if it must be editable by users. All these behavioral settings can only be made in production and will be synced to the sub-environments.

How to use custom columns
- You can only create custom columns in the production environment's user management table. The new custom columns, along with metadata such as field type and validation rules will be automatically synced to the sub-environments (development and testing environments).
- When the custom column sync happens, it will sync only the metadata. This means the data values entered in the custom column in production will not be copied to the custom column in the sub-environments.
- You can add or remove data values in the sub-environment's custom column without affecting the data in the production environment.
Note: Please note that settings or validation changes to a custom column can only be made from production.
- To view the custom column in the sub-environments, click the profile icon > Environments. Click Manage under the development or testing environment.
- Click User management and scroll to the end. Here, you will find the custom column created in production.
The below gif illustrates how the custom column named Date of Joining appears in production and the development environment's user management tables.
