
Lookup field
The lookup field enables users to access data from other flows, allowing them to populate information into a form automatically.
For example, when filling out a rental car request form, instead of manually entering data for all the fields, you can set up a lookup field to retrieve the available cars' information from a dataset.
Creating a flow
You should first create a relevant flow to set up a lookup field. You can build your flow or download a template from the Template gallery.
For example, a rental car dataset might include the following fields:
Primary key
Car models
Images
Configuring the lookup field
You can drag-and-drop a Lookup field from the left side All fields panel and follow the below steps:
Provide a name for the Lookup field in the right-side Settings panel.
Select the dataset containing the cars' information from the drop-down menu Choose a flow to look up.
Under Select fields to use in this lookup, choose all the fields you may need in your form.
Tip:
Make sure to select all the required fields at this stage, as only these fields will be available for lookup layout configuration. You won’t be able to add additional fields later without returning to this screen.In Lookup layout, Text card layout will be applied by default both during and after selection. You can change the layout, by clicking Change layout.

Configuring lookup layout
To enhance usability and readability, you can customize how lookup results appear during and after selection.
Layout during selection
Choose how the lookup field’s results appear when a user selects an option. Available layouts include:
Text card (default): Displays a compact view of key data fields, which is helpful for quickly scanning essential details.
Table: Presents lookup results in a structured row-column format, ideal for comparing multiple entries.
Visual card: Displays data with additional visual elements, making it suitable for selecting items with images.
Value: Shows a minimalistic representation with just the selected value, best for simple, direct selections.

Fields to display
During selection, you can choose which fields to display in the lookup layout. Fields can be reordered by dragging them into the desired order.
Note
Only the fields selected on the previous page (in the Select fields to use in this lookup step) will be available here for selection.

Layout after selection
Decide how the selected lookup results will appear in the form. Here again, you have the option to choose one of the layouts that is compatible with your initial layout selection.

Layout Combinations
You can create different layout combinations based on your preferences:
During Selection |
After Selection |
Description |
Card |
Card |
Lookup results appear as cards, and the selected option is also displayed as a card. |
Card |
Value |
Lookup results appear as cards, but only the configured value is displayed after selection. |
Table |
Card |
Lookup results are displayed in a table format, but the selected option appears as a card. |
Table |
Value |
Lookup results are in a table, but only the configured value is shown after selection. |
Table |
Visual card |
Lookup results are in a table, while the selected option appears as a visual card. |
Visual card |
Visual card |
Lookup results and the selected option both appear in a visual format. |
Visual card |
Value |
Lookup results appear as visual cards, but only the configured value is displayed after selection. |
Value |
Value |
Both the lookup results and the configured value appear as values in a minimalistic format. |
Other layout options
Enable card header (toggle on/off): The toggle is on by default. You can choose your preferred header field from the available drop-down menu.
Note:
If no selection is made, the first applicable text or number field from step two will be used as the header. However, this does not apply to the Table or Value displays, which do not have headers.

Additional configuration for Visual card layout: If you select the Visual card layout, you will have access to additional image configurations:
Select an image: Choose an image field from the drop-down menu to display in the visual card.
Image placement: Specify where the image should appear within the visual card layout:
Left: Displays the image to the left of the text content.
Top: Places the image above the text content.
Previewing the layout configuration
The real-time Preview section to the right shows how the lookup field’s results will look based on your selections, allowing you to visualize the final output before making any changes.

Once satisfied with the layout settings, click Apply to save your changes. By properly configuring the lookup layout, you can enhance data visibility and improve user experience.
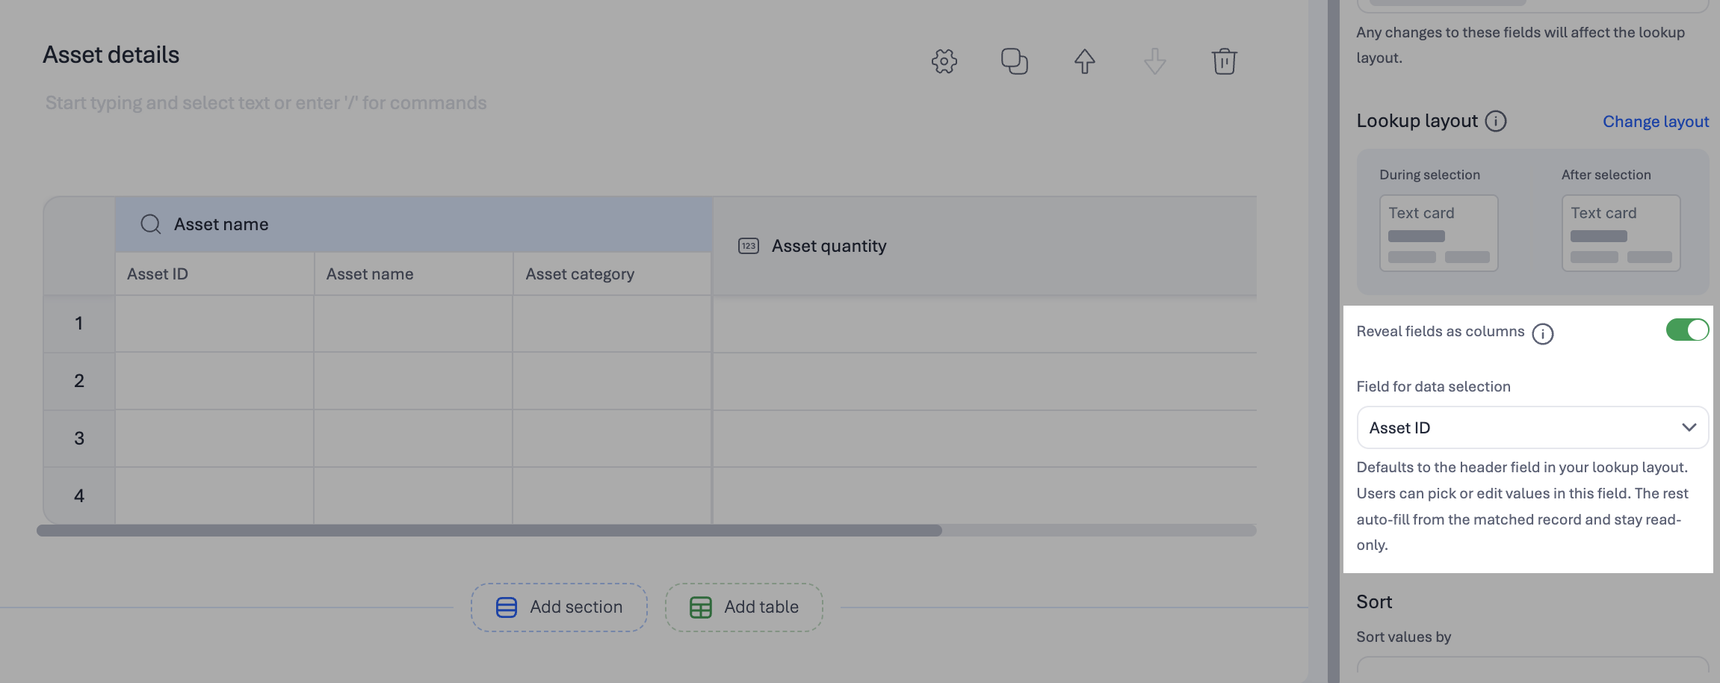
Displaying lookup fields as individual columns
To make reviewing and comparing looked up data more convenient, enable Reveal fields as columns. This displays selected looked up fields as individual columns.
In the Field for data selection drop-down, you can choose which looked up field appears as the first column. By default, the first looked up field is selected. All other columns are auto-filled from the selected record and remain read-only.
Sorting lookup field results
You can sort the lookup fields’ results in either ascending or descending order.
Under Sort values by dropdown menu, select the field you want to use as the basis for sorting.
In the Sort type section, choose whether the results should be sorted in ascending or descending order.

Filtering lookup field results
You can control which values appear in a lookup field by applying filters.
Click Add filter.
Define the filter by selecting the Field, Operator, Type, and Value, then click Done.
To automatically display the first matching value at form runtime, enable the Automatically select the first value based on the filters toggle. This sets the first filtered result as the default for the end user.

Removing a filter applied to the lookup field
To remove a filter from a lookup field, scroll down to the Filter section in the settings panel on the right, and click the Remove button (![]() ) next to the applied condition.
) next to the applied condition.