
Cryptography connector
The cryptography connector is a specialized security in-built tool in Kissflow integrations. It acts as a privacy filter for your data pipeline. While standard connections (like HTTPS) protect data while it travels, the cryptography connector protects the data itself.
It allows you to scramble sensitive information so that even if it is stored in a public spreadsheet or intercepted by a third party, it remains unreadable without the specific digital keys.
The connector functions as a middle step in your integration flow. It takes input from your triggers and actions, applies a mathematical algorithm, and produces a secure output.
Actions in the cryptography connector
Action |
Description |
Symmetric encrypt |
Encrypts data using a single shared secret key. |
Symmetric decrypt |
Reverses the symmetric encryption process to return data to its original, readable form. |
Asymmetric encrypt |
Uses a public key to encrypt data. This ensures only that specific recipient can open it. |
Asymmetric decrypt |
Uses a private key to decrypt data that was encrypted specifically for you. |
PGP sign |
Creates a detached signature. This acts as a digital seal that proves the file was sent by you and hasn't been altered. |
PGP verify |
Compares a detached signature against a file to confirm the sender's identity and data integrity. |
Hash/HMAC |
Generates a unique digital fingerprint. Hash is for integrity; HMAC uses a secret key to prove both integrity and authenticity. |

Cryptography as an action
Symmetric encrypt
The Symmetric encrypt action allows you to secure sensitive text using a shared secret key. This is a high-speed method ideal for protecting data like PII or internal records within your flow.
1. Action and authentication
Add the Cryptography connector to your integration and choose the Symmetric encrypt action.
Choose an account: Select an existing connection or click + Add an account.
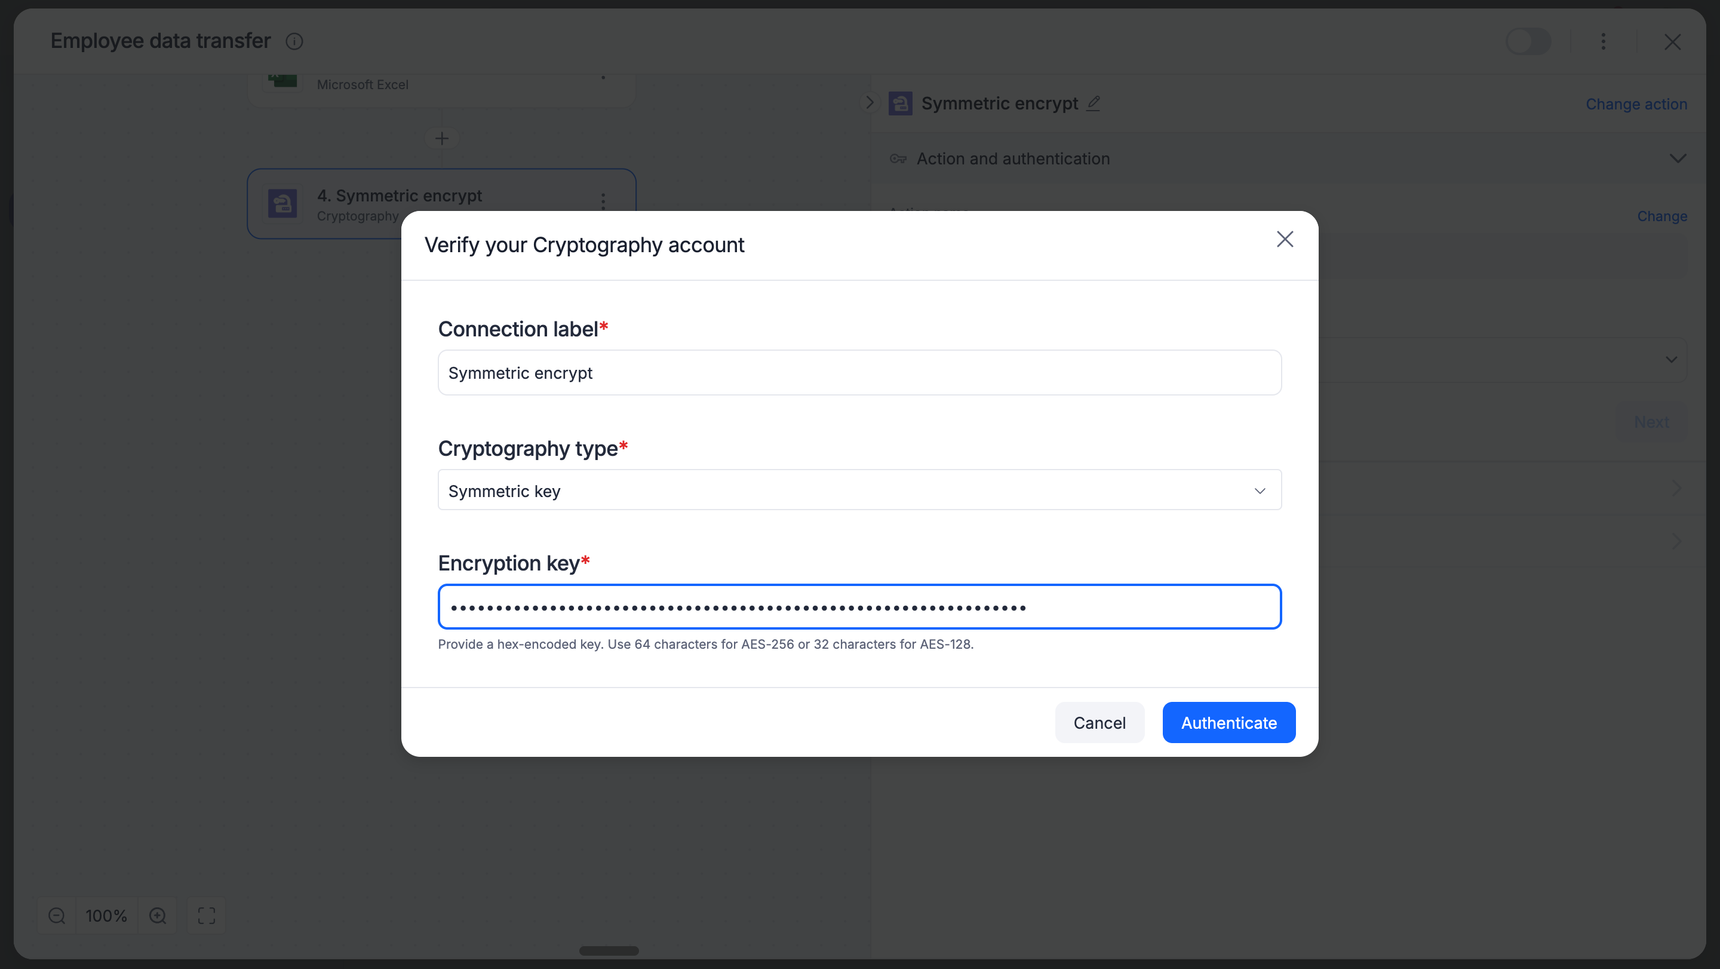
Verify your account:
Connection label: Give your connection a recognizable name.
Cryptography type: Select Symmetric key.
Encryption key: Enter your hex-encoded key.
Note: Ensure your key length matches your intended algorithm (for example, a 32-byte hex key is required for AES-256).
Click Authenticate.
2. Configure the encryption
Open the Configuration section.
Algorithm: Select your encryption method from the dropdown.
Plain text: Map the field you want to secure by clicking Insert field.
Input encoding: Select how the incoming data is formatted.
Output encoding: Select the format for your encrypted result.
Initialization vector (IV): Enter your hex-encoded IV.
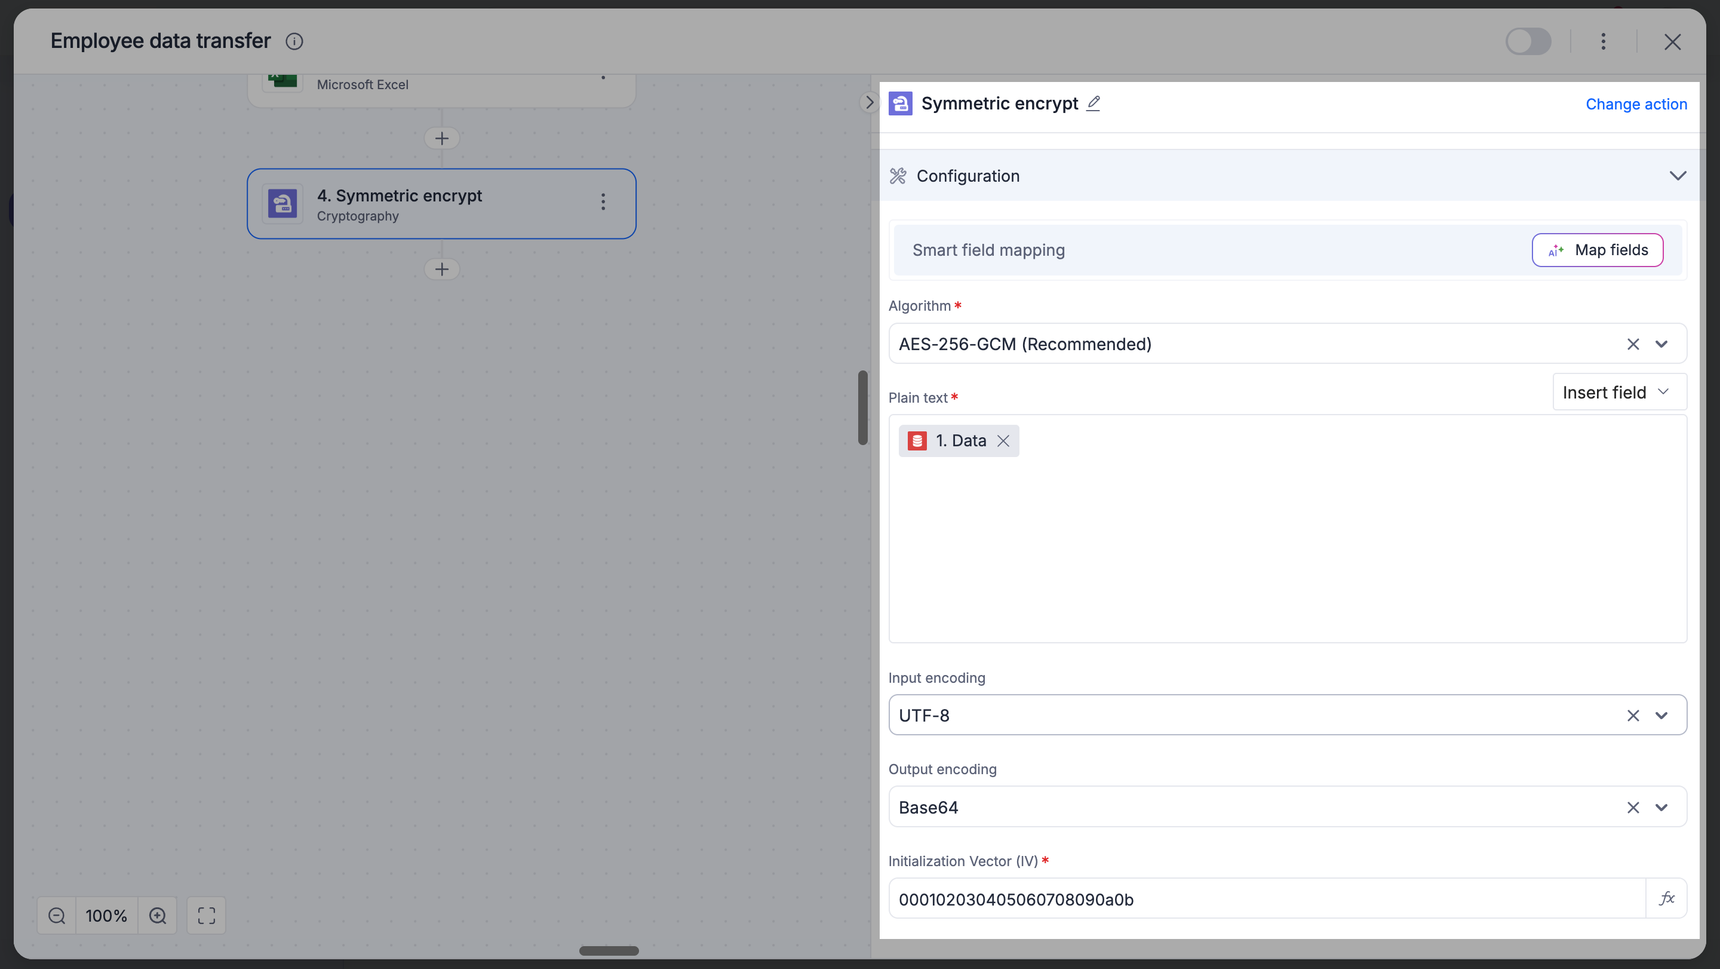
Note
For GCM, this is typically a 12-byte (24 hex characters) string.
3. Test the action
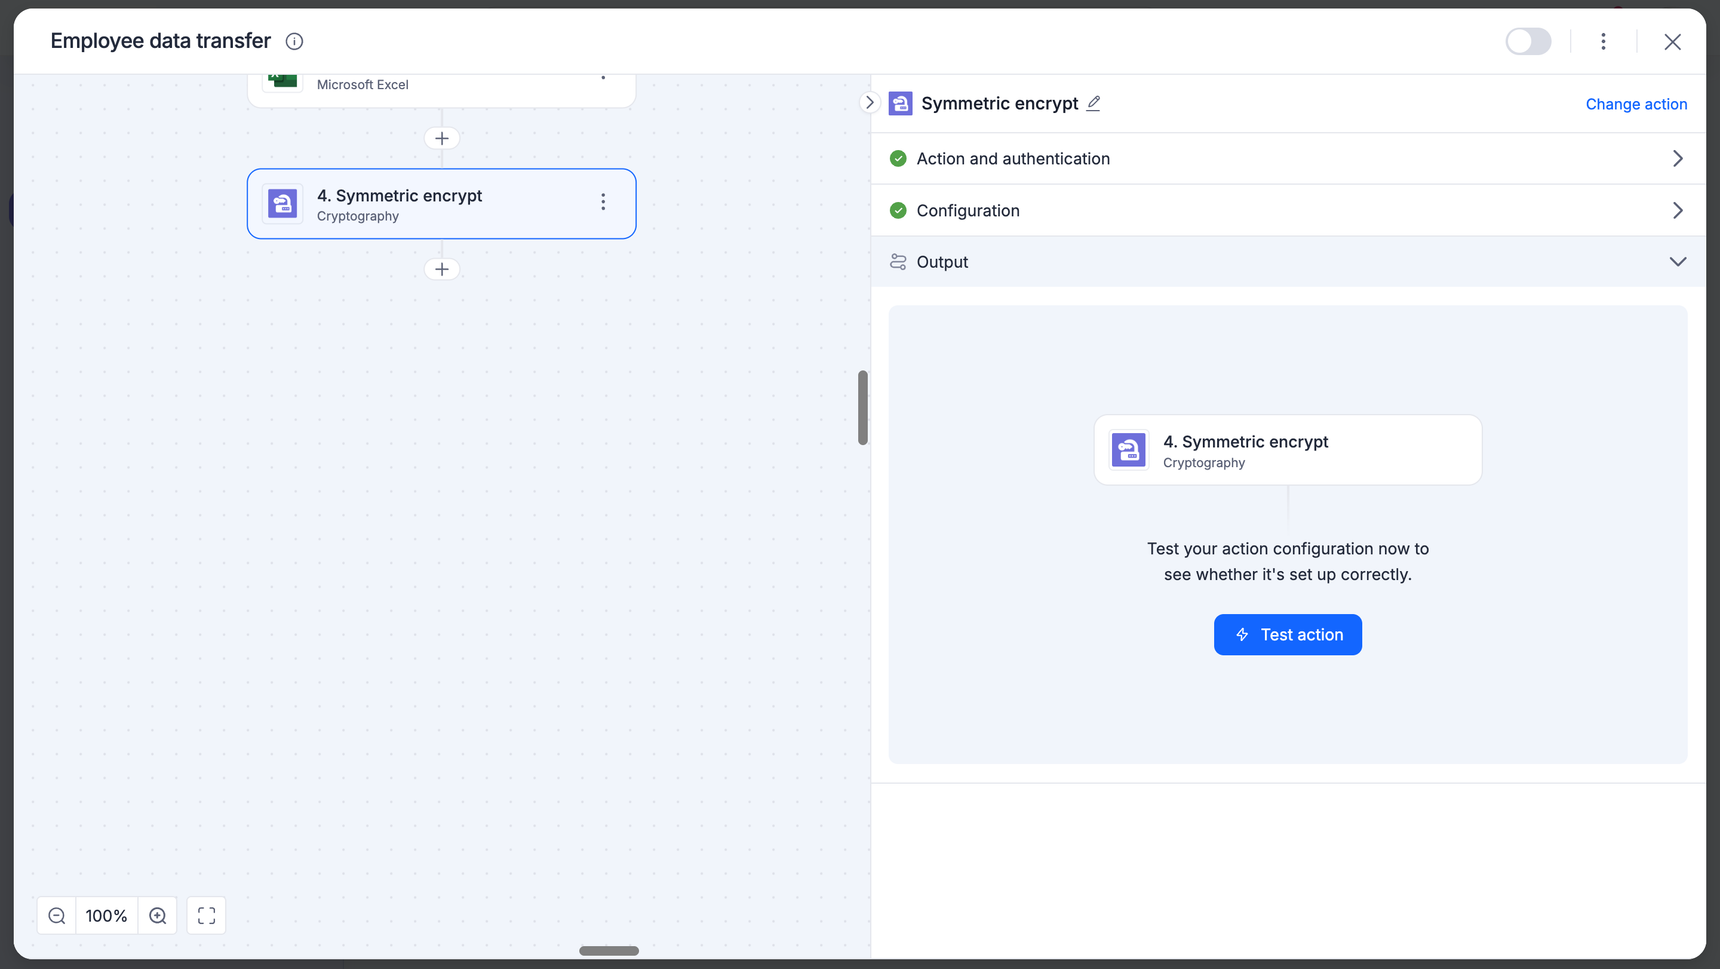
Click Next to proceed to the Output section.
Click Test action to verify your configuration.
Troubleshooting:
- If you receive a 32-byte key required error, check that your encryption key in the connection settings has exactly 64 hex characters (for AES-256).
- If you receive an IV error, ensure your initialization vector matches the required length for your chosen algorithm (for example, 12 bytes/24 hex characters for GCM).
4. Finalize
Once the test is successful, you will see the encrypted output.
Map this output to your subsequent steps (for example, sending the encrypted string to a Database or Google Sheet).
Symmetric decrypt
The Symmetric decrypt action reverses the encryption process, turning unreadable ciphertext back into its original plain text format using a shared secret key.
1. Action and authentication
Add the Cryptography connector to your integration and choose the Symmetric decrypt action.
Choose an account: Select the same connection used for the encryption step, or click + Add an account.
Verify your account:
Connection label: Give your connection a recognizable name.
Cryptography type: Select Symmetric key.
Encryption Key: Enter the hex-encoded key.
Click Authenticate.
2. Configure the decryption
Open the Configuration section.
Algorithm: Select the exact same algorithm used during encryption.
Ciphertext: Map the encrypted data field from a previous step (for example, the output from an encrypt action or an encrypted field from a database).
Input encoding: Select the encoding format of the incoming ciphertext. Output encoding: Select the format for the final decrypted data.
Initialization vector (IV): Enter the hex-encoded IV used during encryption.
Auth tag: Map or enter the authentication tag generated during the encryption process. This ensures the data has not been tampered with.
3. Test the action
Click Next to proceed to the Output section.
Click Test action to verify the decryption.
Common errors:
Invalid authentication tag length: This error occurs if the Auth tag field is empty or contains an incorrect value. GCM requires a valid tag to proceed.
Data integrity error: If the key, IV, or Auth tag does not match the original encryption settings, the action will fail to protect your data integrity.
4. Finalize
Once the test is successful, the connector will display the original, readable data in the output.
Map this decrypted output to your subsequent steps (for example, using the raw data in a conditional branch or a notification).
Asymmetric encrypt
The asymmetric encrypt action uses a key pair system to secure data. By using a public key, you can ensure that only the person holding the corresponding private key can unlock and read the information.
1. Action and authentication
Add the Cryptography connector to your integration and choose the Asymmetric encrypt action.
Choose an account: Select an existing connection or click + Add an account.
Verify your account:
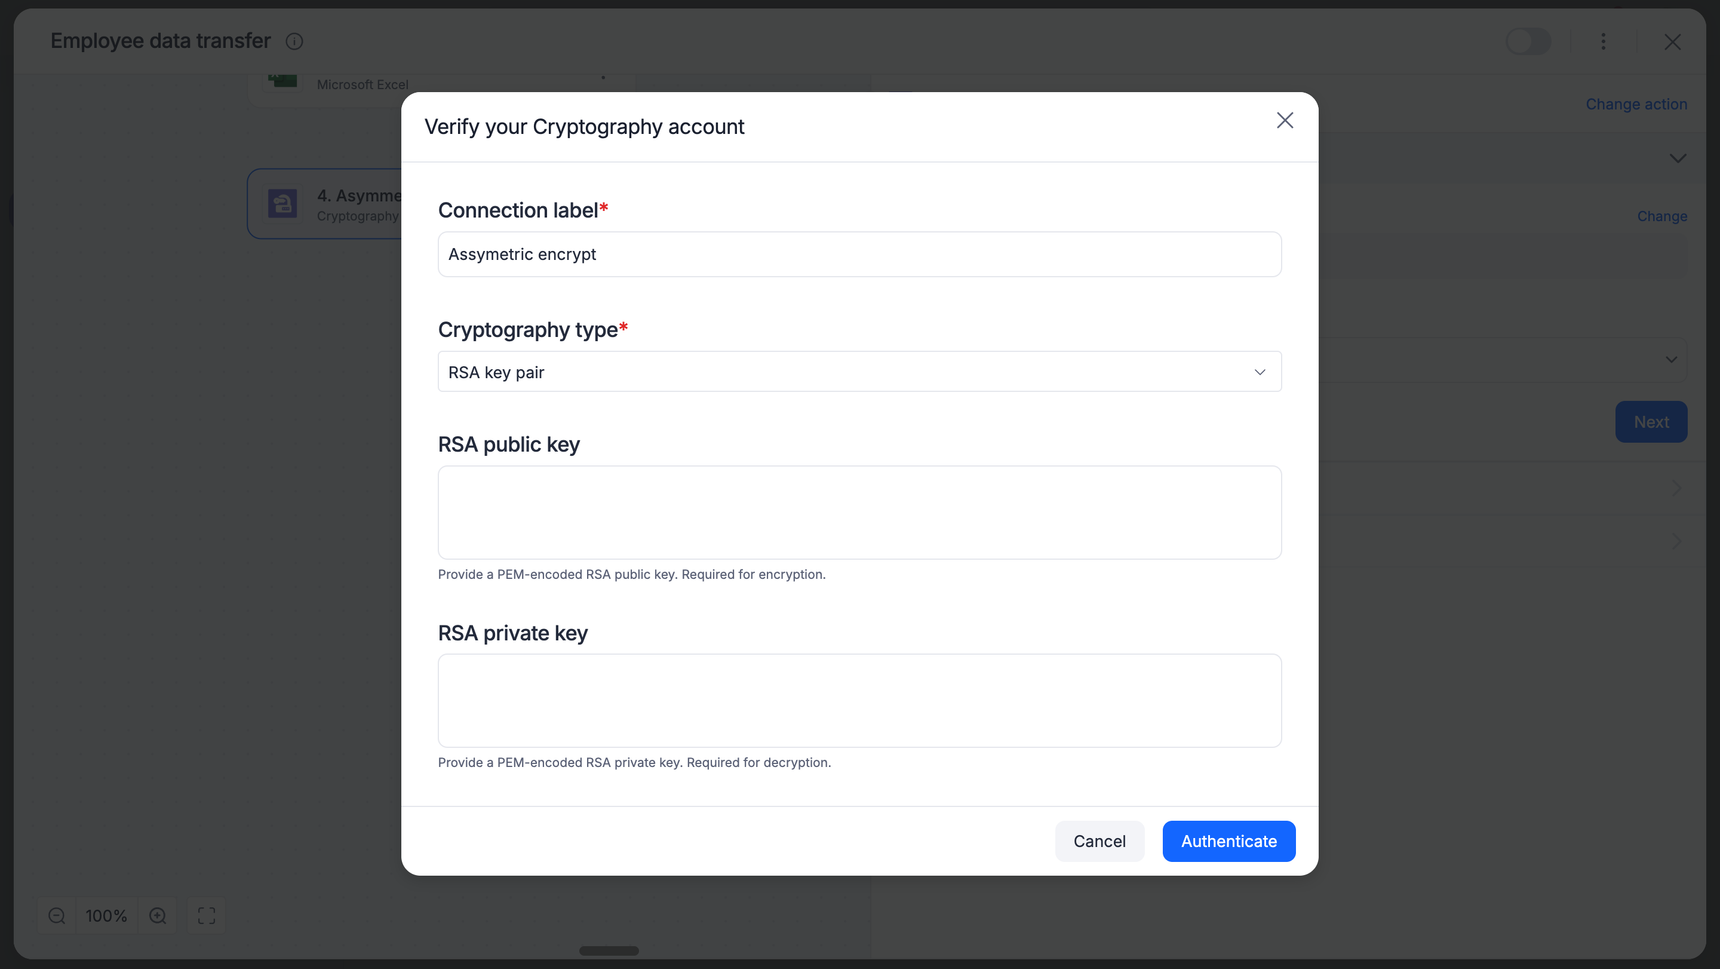
Connection label: Enter a unique name for this connection.
Cryptography type: Select RSA key pair or PGP key pair based on your partner's requirements.
RSA public key: Paste the PEM-encoded public key provided by the recipient.
Note: For encryption, only the public key is required. You may leave the private key field empty if you are only performing encryption.
Click Authenticate.
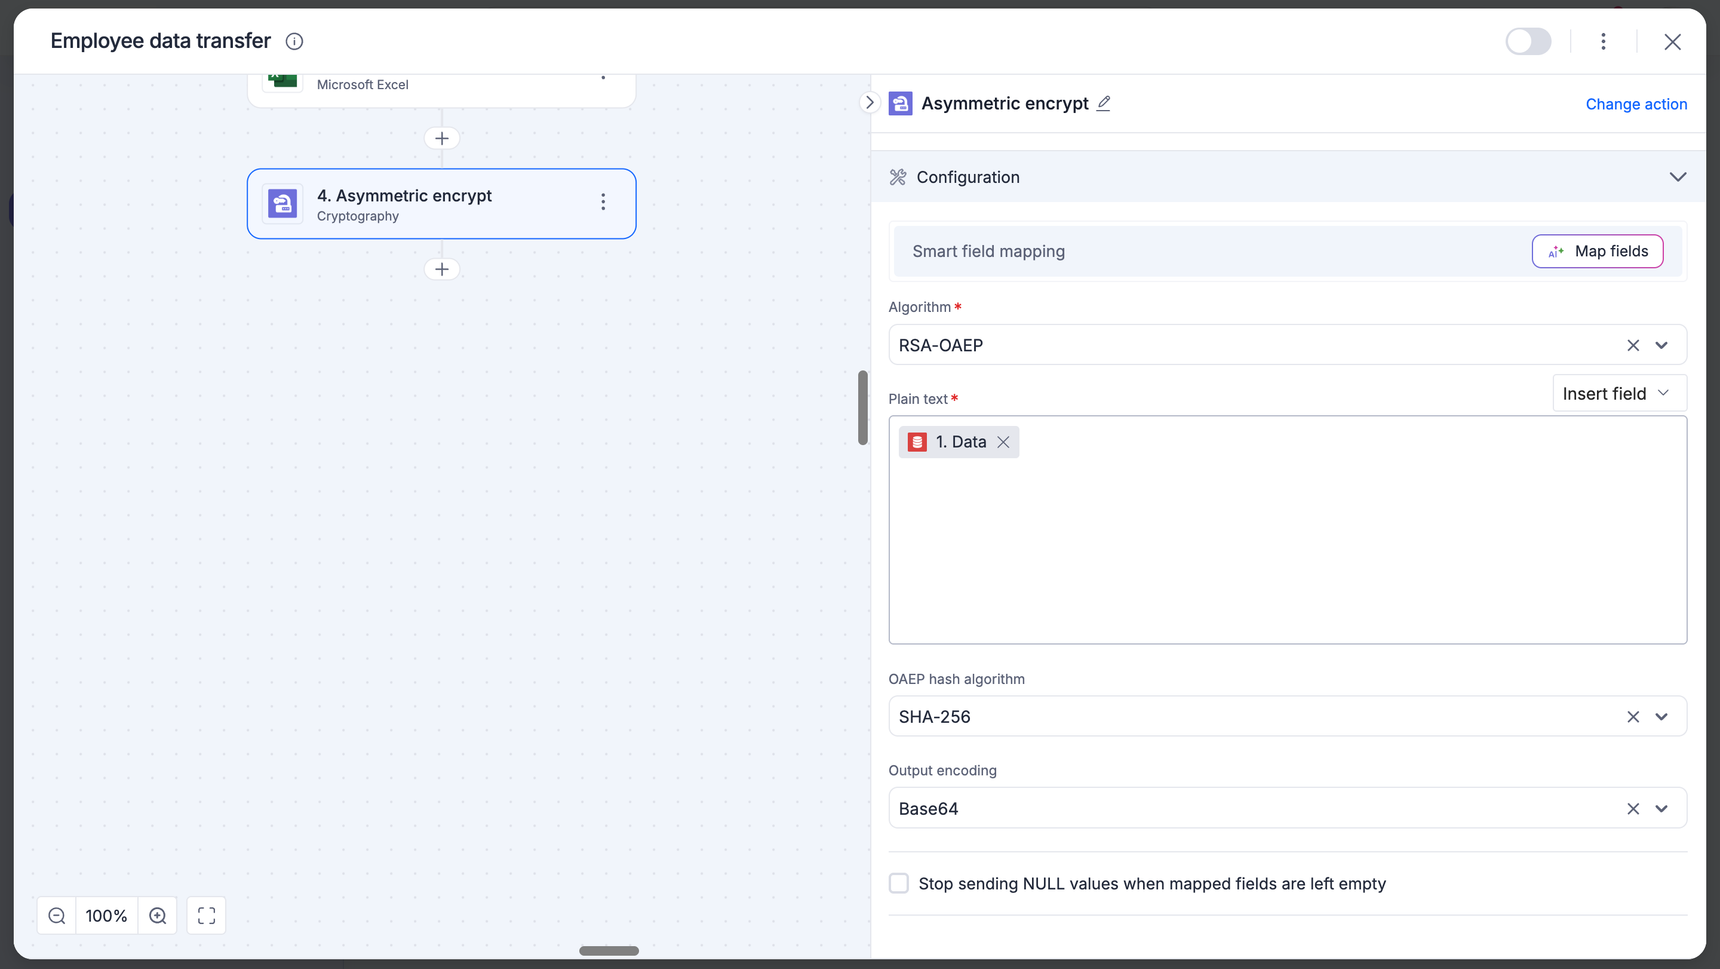
2. Configure the encryption
Open the Configuration section.
Algorithm: Select the asymmetric algorithm
Plain text: Map the sensitive data field from a previous Kissflow step (for example, Account number or Patient name).
OAEP hash algorithm: If using RSA-OAEP, select the hash method. This must match the setting the recipient will use to decrypt.
Output encoding: Select how the resulting ciphertext should be formatted.
3. Test the action
Click Next to proceed to the Output section.
Click Test action to verify the configuration.
Troubleshooting:Invalid key format: Ensure the public key includes the -----BEGIN PUBLIC KEY----- and -----END PUBLIC KEY----- headers.
Data too large: RSA encryption has a limit on the amount of data it can encrypt at once based on the key size. For very large files, consider using PGP or symmetric encryption.
4. Finalize
Once the test is successful, the connector will output a ciphertext string.
Map this output to your next step, such as sending it via an API call or storing it in an external system.
Asymmetric decrypt
The asymmetric decrypt action uses your private key to unlock data that was encrypted specifically for you using your corresponding public key. This ensures that only you can read the incoming information.
1. Action and authentication
Add the Cryptography connector to your integration and choose the Asymmetric decrypt action.
Choose an account: Select your existing RSA key pair or PGP key pair connection, or click + Add an account.
Verify your account:
Connection label: Enter a name for this connection (e.g., Asymmetric decrypt).
RSA Private Key: Paste your PEM-encoded private key.
Note: For decryption to work, private key is mandatory. This key must never be shared and should be kept secure.
Click Authenticate.
2. Configure the decryption
Open the Configuration section.
Algorithm: Select the exact algorithm used by the sender.
Ciphertext: Map the encrypted data field from a previous Kissflow step (for example, an encrypted string received via a Webhook).
OAEP hash algorithm: Select the hash method used during encryption (Standard: SHA-256). If this does not match the sender's settings, the decryption will fail.
Input encoding: Select the format of the incoming encrypted string.
Output encoding: Select the format for the final decrypted data.
3. Test the action
Click Next to proceed to the Output section.
Click Test action to verify the decryption.
Troubleshooting:Decryption error: Usually caused by a mismatch between the public key used to encrypt and the private key used to decrypt. Ensure you are using the correct key pair.
Hash mismatch: If the OAEP hash algorithm (SHA-1, SHA-256, etc.) does not match what the sender used, the data cannot be recovered.
4. Finalize
Once the test is successful, the connector will display the original, readable message in the output.
Map this decrypted output to your next step, such as updating a record in Kissflow or triggering a notification.
PGP sign
The PGP Sign action allows you to create a digital seal for your data. This process uses your private key to generate a unique signature, proving to the recipient that the data originated from you and has not been tampered with.
1. Action and authentication
Add the Cryptography connector to your integration and choose the PGP Sign action.
Choose an account: Select an existing connection or click + Add an account.
Verify your account:
Connection label: Provide a clear name (for example, PGP sign).
Cryptography type: Select PGP key pair.
PGP public key: Paste your armored PGP Public Key block (starts with -----BEGIN PGP PUBLIC KEY BLOCK-----).
PGP private key: Paste your armored PGP Private Key block (starts with -----BEGIN PGP PRIVATE KEY BLOCK-----).
Private key passphrase: Enter the passphrase used to protect your PGP private key.
Note: The private key is essential for the signing process.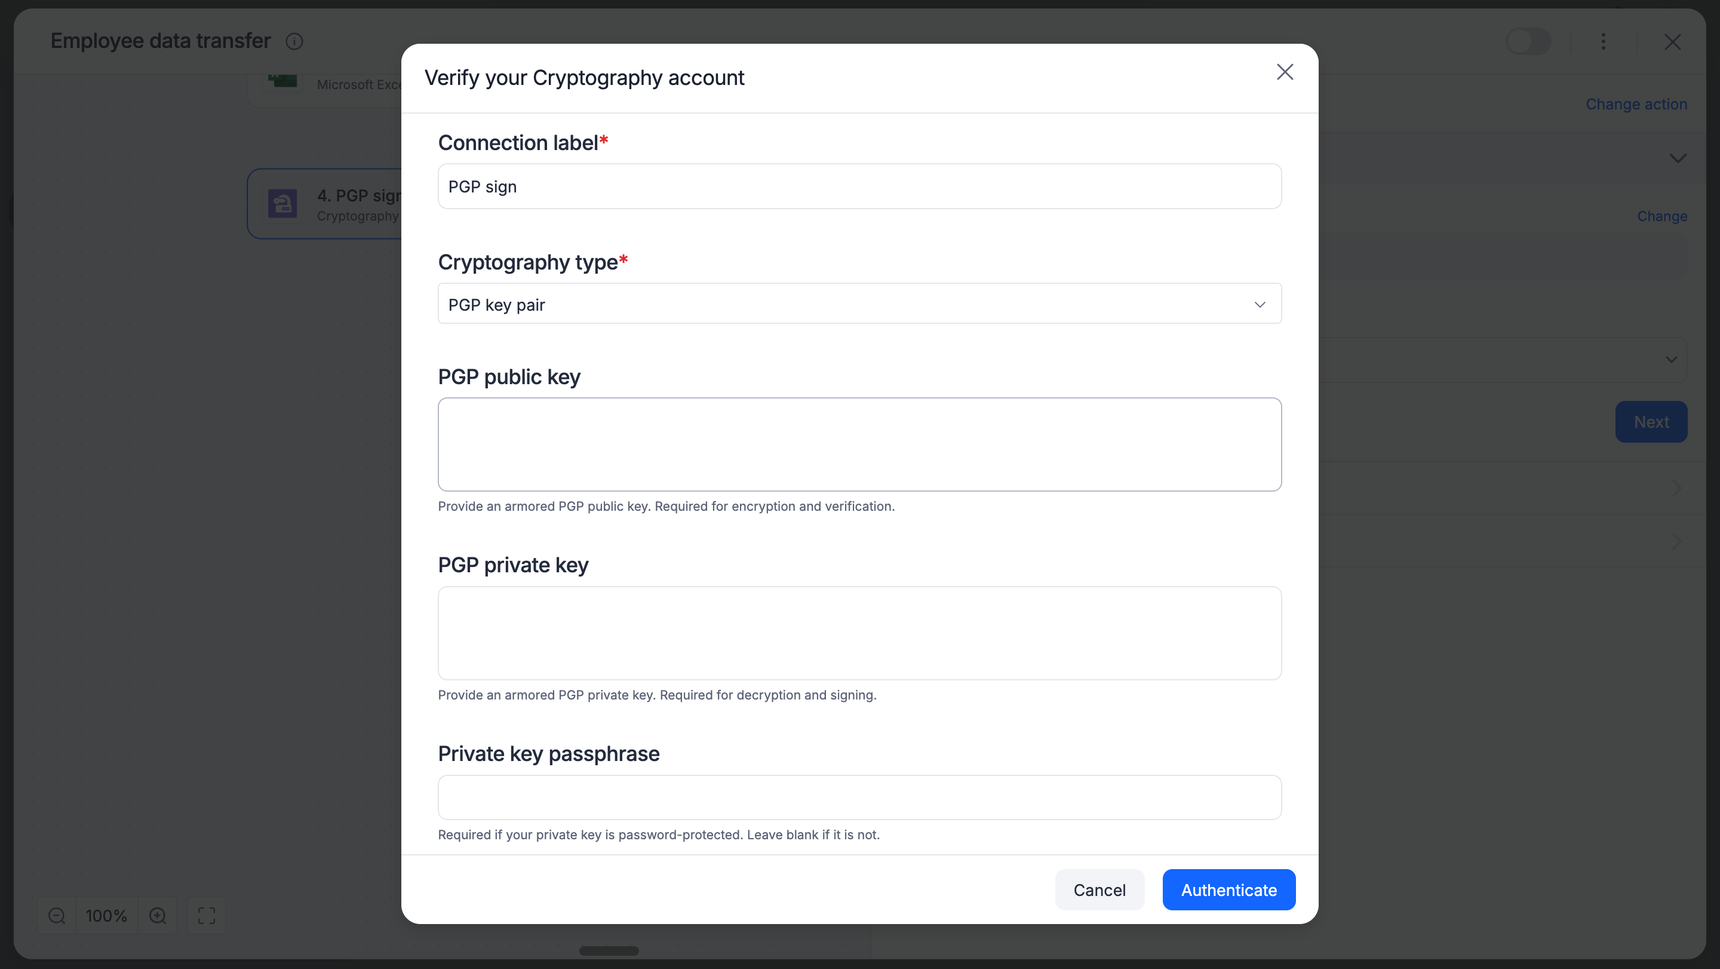
Click Authenticate.
2. Configure the signature
Open the Configuration section.
Data: Map the field or file content you wish to sign (for example, a Name field or a Document from a previous step).
Use Insert field to pick dynamic data from your trigger.
Detached signature: By default, this action generates a detached Signature. This means the original data remains readable, and a separate signature block is produced for verification.
3. Test the action
Click Next to proceed to the Output section.
Click Test action to generate a sample signature.
The result: The connector will return a signature output starting with -----BEGIN PGP SIGNATURE----
Troubleshooting:Invalid key block: Ensure you have copied the entire PGP block, including the headers and footers.
Passphrase error: If the test fails immediately, verify that the passphrase entered in the connection settings matches the one used to create the PGP key.
4. Finalize
Click Done once the test is successful.
Map the Signature output to your next step (For example, sending it as a separate attachment in an email or storing it in a database alongside the original data).
PGP verify
The PGP verify action allows you to validate a digital signature against its original data. This process ensures that the sender is authentic and that the data has not been modified since it was signed.
1. Action and authentication
Add the Cryptography connector to your integration and choose the PGP verify action.
Choose an account: Select an existing PGP Key Pair connection or click + Add an account.
Verify your account:
Connection label: Provide a clear name (for example, PGP verify).
Cryptography type: Select PGP key pair.
PGP public key: Paste the armored public key block of the sender (starts with -----BEGIN PGP PUBLIC KEY BLOCK-----).
Note: For verification, the public key is the primary requirement to validate the signature's authenticity.PGP private key and passphrase: While primarily used for signing/decrypting, these may be required depending on your specific PGP key ring setup.
Click Authenticate.
2. Configure the verification
Open the Configuration section.
Data: Map the original, unencrypted data field that needs to be verified (for example, the Name field from your trigger).
Signature: Map the armored PGP signature string (starts with -----BEGIN PGP SIGNATURE-----). This is typically the output from a previous PGP Sign action or a .sig file received from an external system.
3. Test the action
Click Next to proceed to the Output section.
Click Test action to run the verification.
Troubleshooting:Malformed armored text: This error occurs if the signature string is incomplete, missing the PGP headers or footers, or contains invalid characters. Ensure the entire block is mapped correctly.
Verification failed: If the data has been changed by even one character after being signed, or if you are using the wrong public key, the test will fail to protect the data's integrity.
4. Finalize
Once the test is successful, the connector will confirm the signature is valid.
You can now use this verified status to trigger the next step in your workflow, such as approving a document or moving a file to a secure folder.
Hash/HMAC
The Hash/HMAC action allows you to generate a unique digital fingerprint for your data (hashing) or verify the integrity and authenticity of a message using a secret key (HMAC). This is essential for secure data transmission and verifying that data has not been tampered with.
1. Action and authentication
Add the Cryptography connector to your integration and choose the Hash/HMAC action.
Choose an account: Select an existing connection or click + Add an account.
Verify your account:
Connection label: Give your connection a recognizable name.
Cryptography type: Select No authentication (Hashing only) if you only need a standard hash (for example, SHA-256).
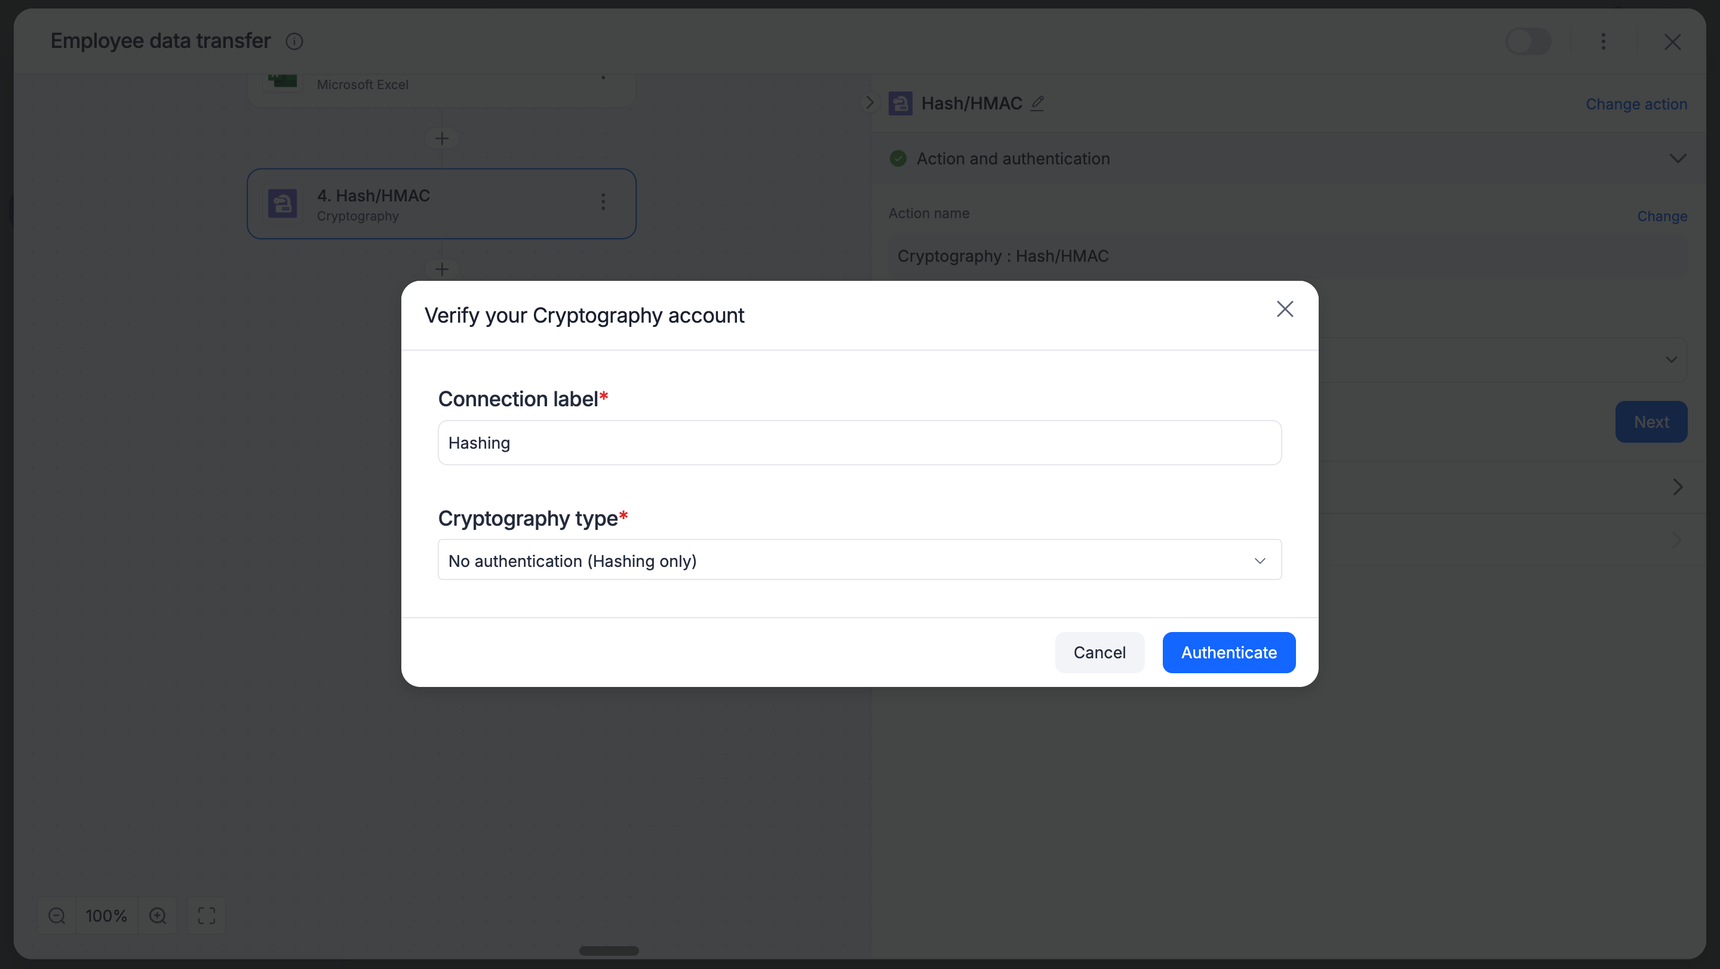
Note: Select Symmetric key if you intend to perform an HMAC operation.
- Click Authenticate.
Note: If you are performing an HMAC operation, you must select Symmetric key as the Cryptography type to ensure you can provide the required secret key. If you select No authentication (Hashing only), the HMAC functionality will not be available.
2. Configure the operation
Open the Configuration section.
Algorithm: Select your hashing method from the dropdown (for example, SHA-256, SHA-512).
Data: Map the field containing the text you want to hash or sign by clicking Insert field.
Input encoding: Select how the incoming data is formatted.
Output encoding: Select the format for your resulting hash (Hex or Base64).
3. Test the action
Click Next to proceed to the Output section.
Click Test action to verify your configuration and ensure the hash/HMAC is generated correctly.
4. Finalize
Once the test is successful, you will see the generated hash or HMAC string.
Map this output to your subsequent steps (for example, storing the hash in a database to verify data integrity later).
Sample use cases
Use case |
Recommended action |
Why? |
Masking PII |
Symmetric encrypt |
Use this to hide social security numbers or salary info before saving them to a shared Google Sheet. |
Secure B2B transfer |
Asymmetric encrypt |
Use this when sending customer data to an external partner. You use a public key so only they can read it. |
Webhook validation |
Hash/HMAC |
When Shopify or Stripe sends an order to Kissflow, use HMAC to prove the message actually came from them and not a hacker. |
Legal compliance |
PGP sign |
Use this when sending contracts. It provides a digital seal that proves the document is original and untampered. |
File integrity |
Hash |
Use this after downloading a large file to ensure the file wasn't corrupted or broken during the transfer. |